We will be making a Jedi robe. What you want to do first is open up the KTool. Expand whatever game you wish. Then expand the BIFs. This should look like this:

Next expand the Templates.bif section.

//take a look on how i centered these images
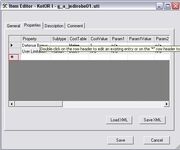
Now expand the blueprint, Items section. Scroll down till you see g_a_jedirobe01. Double click on it. You should now see this-

First thing we want to do for making our new jedi robe is change the "Template ResRef. You can change this to whatever you want as long as it is unique. For this tutorial I will be naming it g_a_jedirobe37. Change the "Tag" to the exact same thing. Next you want to change the "Cost" to whatever you desire. Change "Additional Cost" to the same thing. If you want a new texture that you make change texture Variation to the tho digit prefix of your robe's texture. (EX- the base Jedi robe's texture name is pmbi01/pmbi01. When you re-texture the robe you save it as pmbi79 or pfbi42. As long as it is unique it will not override any existing robe. So you change that to 79 or 42. Or whatever 2 numbers you pick.)
Next thing you do is click on the properties tab at the top.


This is where we edit the bonuses the robes give. To add a property you double click on the star:

This menu should open up-

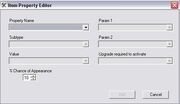
Click on the arrow pointing down under Property Name.
For this tutorial we will be adding the property "Immunity"


Click on "Immunity"
More options should now open up. You now want to click on the drop-down menu for "Subtype"
You can then click on whatever you wish to be immune to. I am going to add "Immunity to Poison".
Once you select that click add.
Now that we are done with adding properties we will now go to the tab "Description"
Under "Name" in the tab you type in whatever you want the robe to be called.
Under the "Identified Description" field you then type in whatever you want the description to be. (EX- These are my uber-pwnage robes.)
Now you are done with your new robe's uti file you click "Save" Choose where you want to save it at. If you know squat about the computer you should know how to do this. Once you found the spot save it as whatever you used for the tag (We used g_a_robe37)
ICONS You will need to download Adinos' Model Viewer
First find the model of the item you skinned. If you made a new model use that. Lightsabers are an exception.
They are under bifs-models. Or for k1, if its an armor, or player head, it us under bifs-player. If its a party member it will be under bifs- party.
Exatract the models to the same directory as the texture you modified.
Now extract a icon for the same type of item. ( The first texture pack, "I" (for jedi robe 01 it is ia_jedirobe01) change 01 to the number in your tga file (ex pmhc37)
Load up Adinos' Model Viewer
Go into "file" "open"
Locate the model. It should open it up. The model will be spinning around. If you get a message to locate the texture, first make sure your texture is in the same directory as the model. If it is, rename the texture to what it says to find. It should work then.
Maximize the viewer
Wait for the model to turn to front and then press "prt scr" on your keyboard. Paste it into your image-editing program. Select the part of it that you want to have as your icon.
Scale it down to 64 by 64 pixels and open up the icon file you extracted earlier and copy and paste in your new icon.
And there you have it, new icons! |}
by canderis